 White Mountain is the standard most people use.
Shop Ice Cream Makers | www.whitemountainproducts.com
Hand Crank: 4-qt $153, 6-qt - $170
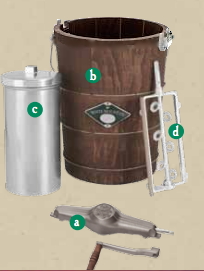
a. Hand crank
b. Bucket - crafted of select pine from New England
and bound with strong galvanized hoops and
electroplated fittings to ensure lasting stability. There is a hole at the top to allow the salty brine to run out before it reaches the top of the canister.
The small recipes I've been using recently start with less than a quart of cream and freeze before the ice has melted that much.
c. Canister - The tall canister design allows the
ice cream to come in close contact with the ice
and rock salt making it freeze faster.
d. Dasher - The beechwood blades are
self-adjusting to ensure uniform scraping
of the ice cream mixture on the canisters
interior sidewall.
You crank the handle clockwise, this causes the canister to spin clockwise while the dasher blades spin counterclockwise to scrape the cream off the sides. The inner bit stays still while everything moves around it.
The hand-crank ice cream churn was first patented in 1843 by an American woman named Nancy Johnson of Philadelphia. Who says women don't have engineering ingenuity?
I threw this in because as I'm writing it a story about women in tech went viral on the Internet. See Storm at Google over engineer's anti-diversity memo - CNN Aug. 6, 2017
Instructions:
What you need:

4 quart:
Ice: 14 - 16 pounds or 32 - 36 cups (8 - 9 quarts)
Rock Salt: 2.5 - 3 pounds or 3 cups
Water softener crystals (Sodium Chloride) is the same.

It is best to make a cooked recipe the night before, so it has plenty of time to chill.
Ice & rock salt
 Rock salt causes ice to melt quicker by lowering its melting point.
 A ratio of 5 cups of ice to 1 cup of salt is best.
 Brine temperature should remain constant at 8 to 12° Fahrenheit.
 Ice from your freezer or the kind you buy at the grocery store will work.
  My mother used to freeze ice in 1/2 gallon milk cartons (this was common)
 We put the ice in a gunny sack (burlap bag) and used a mallet or hammer or break it up.
Note:  For first time use, or first use of the season,
wet the wooden bucket by filling it 1/2 full with tap
water and allowing it to sit for 60 minutes before use.
Let's Get Started:
- . Place the stainless steel canister into the wooden bucket, so that it rests easily on the
metal guide in the bottom of the bucket. Insert your dasher in the canister making sure
that the protrusion on the bottom of the canister fits into the socket of the dasher.
-
Pour your refrigerated recipe into the canister, never filling it more than half full.
Assemble the can cover and turn the dasher stem with your fingers until it turns freely.
- Place the gear frame into position by grasping the gear frame and engaging the dasher
stem into the socket of the gear frame.
For Hand Crank Ice Cream Makers: Slide the cranking end into the bucket ear.
The opposite end of the gear frame will fit into the bucket latch.
- Distribute about 3 inches of ice in the bottom of the tub,
then distribute a half cup of salt.
Then alternate ice and salt to the top of the can.
- Start cranking
- When your ice cream mix has been churned sufficiently (20-25 minutes - can be
longer if cranking by hand) and becomes the consistency of soft ice cream. This can be
determined when it becomes difficult to turn the crank.
If ice cream has not become the consistency of heavy whipped cream after 20 minutes,
add a little more salt.
Some people say that you should crank faster at the start or end. I haven't seen any confirmation of this. A consistent speed works best for me.
- Holding the canister cover securely, carefully remove gear frame. Remove the
canister cover, take the dasher out, and scrape off excess ice cream with a wooden spoon. You
are now ready to eat the ice cream or pack the ice cream for a harder consistency.
Occasionally, your White Mountain Ice Cream Freezers dasher blade screws may loosen
allowing the blades to move more than 1/8" from the dasher.
Simply screw the blades down to 1/8" and resume freezing.
Source: White Mountain Owners Manual
Helpful Hints White Mountain:
- For best results, wash metal canister and lid with baking soda and water prior to first use.
- Do not fill the canister more than half full of mixture to be frozen. The mixture expands
as it freezes.
- Protect all working surfaces with newspaper. Salt is corrosive. Be careful not to kill
backyard grass when making ice cream outdoors.
- Use rubber gloves to protect hands from cold and salt.
- Use a glass or plastic measuring cup for rock salt, salt pits metals.
- Use a wooded spoon for stirring and repacking ice cream. Wood does not conduct heat.
- It is best to make a cooked recipe the night before, so it has plenty of time to chill.
- Make sure your wooden scraper blades are 1/8 inch away from the metal dasher. These
screws are set at the factory and should be loose, but never more than 1/8 inch or the end
result may be freezing around the canister while the middle remains liquid.
- Freezing time should not be too slow or too fast. A greater amount of salt will melt the
ice faster causing the ice cream to freeze faster. Freezing too quickly will not allow for
sufficient agitation and will produce a coarse texture. An extended period of freezing
causes a spongy, buttery texture.
- If packed properly for freezing, left over ice cream can be kept up to a month.
If not packed properly you will lose taste and texture of the ice cream.
- The salt used in making homemade ice cream is rock salt. It is a coarse salt and should
be used instead of regular table salt.
- For vanilla base mixes, be creative and add crumbled cookies, candies, granola, instant
coffee mixes, chocolate bits, jams, or peanut butter.
- Try filling pre-cooked pie shells with ice cream before the final hardening or fill orange
and lemon shells with homemade sherbet. Also, fill puff shells with ice cream and top
with sauce.
- The ice cream immediately after completion is similar to a soft serve ice cream. To have
a more firm ice cream such as for ice cream cones, then harden the ice cream either using
the old fashioned way or by packing the ice cream and placing in your freezer.
- Please hand wipe or hand wash all parts to keep your ice maker in the best condition, do
not place in dishwasher.
Links:
White Mountain Owner's Manual
Hand-Crank Ice Cream for Cranks: 5 Steps (with Pictures)
Hints on using White Mountain Ice Cream Makers - from Peas and Corn Company
- The Science of ice cream
Return to Recipes
last updated 7 Aug 2017
|
 Food
Food